

NestJS-Getting Started Made Easy
Mastering NestJS: The Beginner's Blueprint


NestJS is a powerful framework for building scalable and maintainable server-side applications using TypeScript. It is built on top of Express.js and leverages the power of TypeScript to provide a solid foundation for building enterprise-grade applications. In this blog, we will take you through the process of getting started with NestJS and building our first application. Let’s dive in!
Prerequisites
Before we get started, make sure you have the following prerequisites in place:
Node.js and npm: Ensure you have Node.js (preferably a LTS version) and npm (Node Package Manager) installed on your system. You can download them from the official Node.js website.
NestJS CLI: NestJS offers a powerful CLI to scaffold and manage your projects. Install it globally:
npm install -g @nestjs/cli
Creating a New NestJS Project
Now that you have all the prerequisites in place, you can create your first NestJS project using the CLI. Follow these steps:
Open your terminal and navigate to the directory where you want to create your NestJS project.
Run the following command to create a new NestJS project:
nest new my-app
you can replace my-app with the name of your project
3. The CLI will prompt you to select various options for your project, such as the package manager (npm or yarn), the project type, and other settings. Choose the options that best suit your needs.
4. Once the project is created, navigate to the project directory:
cd my-app
Our NestJS project is now set up and ready to go.
Exploring the Project Structure
A NestJS project has a specific structure that makes it easy to organize your code. Here’s an overview of the key directories and files in our project:
project_directory
|-- dist
|-- node_modules
|-- src
|   |-- app.controller.spec.ts
|   |-- app.controller.ts
|   |-- app.module.ts
|   |-- app.service.ts
|   `-- main.ts
`-- test
src: This directory contains our application's source code.main.ts: The entry point of our application.app.module.ts: The root module of our application.app.controller.ts: A basic controller with a single route.app.controller.spec.ts: The unit tests for the controller.app.service.ts: A basic service with a single method.test: This directory is for our unit and e2e tests.dist: The output directory where the transpiled JavaScript code will reside.node_modules: The directory where our project's dependencies will be stored.
Note: Be ready to unlock the hidden secrets of NestJS’s components and architecture in our thrilling upcoming blog!
Creating a Basic Controller
A controller is responsible for handling incoming HTTP requests and providing appropriate responses. Let’s create a basic controller to handle a simple GET request.
- Now let’s proceed by writing the code below in our app.controller.ts
import { Controller, Get } from '@nestjs/common';
import { AppService } from './app.service';

@Controller()
export class AppController {

  @Get()
  getHello(): string {
    return "Welcome to Hrugved's NestJS Blog"
  }
}
2. Now we need to define route for this controller.Open the ‘app.module.ts’ file and update the code as follows:
import { Module } from '@nestjs/common';
import { AppController } from './app.controller';

@Module({
  controllers: [AppController]
})
export class AppModule {}
Now our controller is registered in the application module , and \ route will return “Welcome to Hrugved’s NestJS Blog”.
Starting the Application
Now it’s time to start our NestJS application. Run the following command from the root of your project:
npm run start
This will start the NestJS application, and you will see output indicating that the server is running. By default, it listens on port 3000.
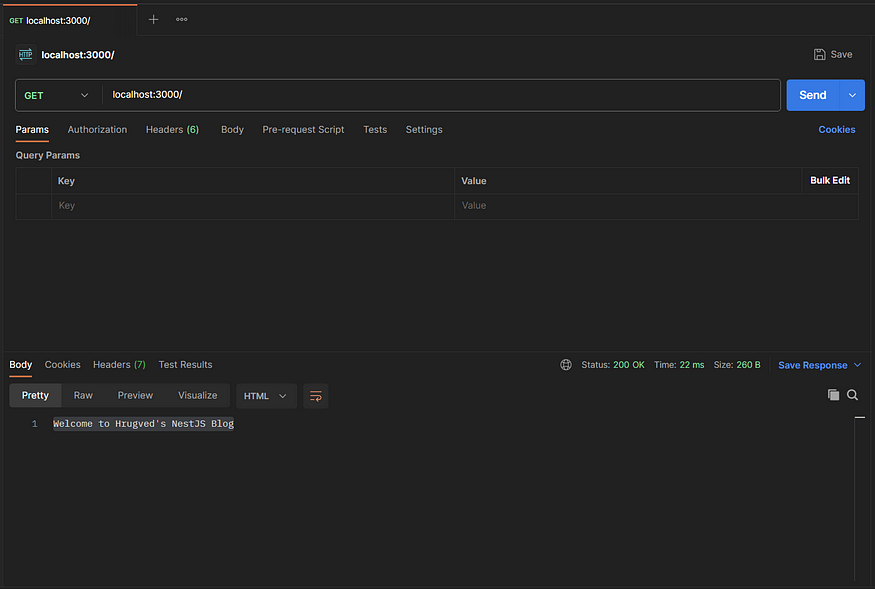
Testing the Application
To test our application, open a web browser or a tool like Postman, and make a GET request to http://localhost:3000. We should receive the "Welcome to Hrugved’s NestJS Blog" response.
In this blog, we’ve taken our first steps into the exciting world of NestJS, building a simple “Hello, NestJS” application. You’ve learned how to set up a NestJS project, create a basic controller, and start the application. But this is just the tip of the iceberg.
In our next blog, we’ll delve deeper into NestJS, exploring advanced topics, best practices, and real-world use cases. We’ll equip you with the knowledge and skills to take your NestJS applications to the next level.
Stay tuned for the upcoming, more exciting, detailed, and advanced blog on NestJS. We’re excited to continue this journey with you as we uncover the full potential of this incredible framework. Until then, happy coding!